How to draw space with a pencil or watercolor. Space pictures and games for children Drawing the universe with a pencil
Summary: Children's drawings on the theme of space. How to draw a picture for Cosmonautics Day.
On the eve of Cosmonautics Day, it will be relevant to talk about children's drawings on the theme of space. In this article we want to tell you how to draw space using non-traditional drawing techniques. Here we will consider drawings on the theme of space, made in the techniques of scratching, passe-partout, "spray". You will also learn how to draw an unusual drawing for Cosmonautics Day using shaving foam or bubble wrap. The techniques for drawing the cosmos described in the article are easy to perform and are available, including to children of preschool and primary school age.
1. Drawings on the theme of space in the technique of scratching
The word "grattage" comes from the French gratter - scrape, scratch, so another name for the technique is the scratching technique.
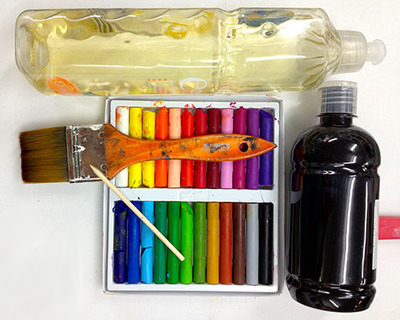
To draw a drawing on the theme of space using the scraping technique, you will need:
Heavyweight white paper (or cardboard)
- colored wax crayons
- black gouache paint or ink
- dishwashing liquid
- brush
- any sharp object (wooden skewer, toothpick, knitting needle, etc.)
Work plan:
1. Color the paper with freestyle colored wax crayons. Do not spare the crayons, they should cover the paper with a thick layer. Note: even a small child can handle this part of the work.

2. Mix 3 parts black gouache paint (ink) and 1 part dishwashing liquid. Spread the mixture evenly over the paper.

3. Let the paint dry completely. You can speed up this process with a hair dryer. And now the most interesting! Take any sharp object and scratch your drawing on the theme of space with it. The result will be an original work for the Day of Cosmonautics, made in an unconventional drawing technique, scratching

2. How to draw space. Drawing in the technique of "passe-partout"
This is a very unusual and fascinating drawing technique. First, as in the previous technique, you need to color a sheet of paper with colored wax crayons. As a result, you will get a bright, colored rug. After that, draw patterns of planets, flying saucers, space rockets, stars, etc. on cardboard. Cut out templates. On a thick sheet of black paper, lay out the cut out patterns in the form of a composition. Circle them with a pencil, then cut out the silhouettes with nail scissors. Note: This step must be performed by an adult. Now put a black sheet of paper with cut out silhouettes on the "rug" painted with crayons. Drawing space in the technique of "passe-partout" is ready. Link to original source.

3. Children's drawings on the theme of space. Painting with shaving foam
For children in creativity, the process itself is more important than the result. We, adults, are interested in the final product of our activity. Today we want to offer you a kind of coloring game that will satisfy the needs of both children and adults. The site games-for-kids.ru describes an interesting way to create a so-called. "marble paper" using regular shaving foam and paints (or food coloring). Using the detailed instructions for making "marble paper" described on this site, you can make beautiful drawings on the theme of space for Cosmonautics Day.

4. Drawings for the day of cosmonautics. Draw space to music
In 1914-1916 the English composer Gustav Holst composed the symphonic suite The Planets. The suite consists of 7 parts - according to the number of planets in the solar system (excluding Earth) known at the time of writing. We invite you to conduct the following interesting lesson with your child on the theme of space, on the eve of Cosmonautics Day.
Give your child a large sheet of paper and paint. Ask him to divide the sheet into four equal parts with a simple pencil. Now let him listen in turn to any 4 parts of the suite (for example, Mars, Venus, Jupiter, Uranus). Listening to each part of a piece of music, he must depict on canvas the emotions and feelings that this music evokes in him. Children usually like this kind of work very much. Here is what one of our students drew.

From the resulting abstract paintings, then it will be possible to cut out the planets and stick them on a sheet of black paper. The drawing for Cosmonautics Day is ready!


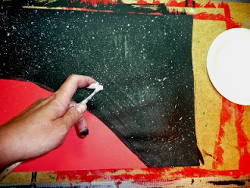
5. Drawings on the theme of space. Drawing space with a toothbrush
We suggest you make a drawing on the theme of space in the so-called. spray technique. Using a toothbrush, splatter white paint on a sheet of black paper. You will have a starry sky. Planets can be drawn with a sponge, smearing paints of different colors with it. Look what a beautiful drawing on the theme of space we got!


6. Children's drawings on the theme of space. Non-traditional drawing techniques
If you suddenly have a piece of bubble wrap lying around at your house, now is the time to use it for children's creativity. After all, with the help of this wonderful material, you can very simply paint the planet. It is only necessary to apply paint to the film and attach it to the drawing in the right place.

The planet in the figure below is also made in this non-traditional drawing technique. Additional prints were made using a cardboard toilet paper roll and a plastic straw. Also, when drawing this drawing on the theme of space, the so-called. spray technique.


7. Drawings space. Drawings for Cosmonautics Day
An interesting project for children on Cosmonautics Day was prepared by MrBrintables.com. On this site you can download and print a drawing of the moon. The moon is presented in three sizes: large (22 sheets), medium (6 sheets) and small size (1 sheet). Print the drawing, stick the sheets on the wall in the correct sequence.
Now invite your child to dream up who lives on the moon. Let him draw its inhabitants, their houses, transport, etc.

8. Drawings on the theme of space. Children's drawings on the theme of space
These charming aliens are drawn using such an unconventional drawing technique as blowing paint through a straw (plastic tube). What is this technique?

We apply paint diluted with water with a brush (or pipette) on a sheet of paper so that a stain of paint is obtained on the sheet. After that, we blow on the paint through a straw, it spreads in different directions and we get a spot of a bizarre shape. When the paint dries, we finish our alien with all the necessary details.
"Each atom of our body
was once a star.
Vincent Freeman
A week ago on our creative instagram @miftvorchestvo we launched a competition for the best assignment from the notebook "642 ideas of what to draw" . The task sounded simple - space. Many creative and creative works were published for the competition. You can see them all by the tag. We publish the best works and give a step-by-step master class on how to learn how to draw space.
The best works for the contest #642 ideascosmos

"If you can't fly into space, make it fly to you." Photo by @al.ex_kv.


“And when darkness sleeps beside you, And the morning is far away, I wanna hold your hand and guide you…” Parov Stelar ft. Lilja Bloom - Shine. Photo by @julia_owlie.

Are they really cool? 🙂

Step by step master class
If you did not participate in the competition, but also want to learn how to draw space, save yourself somewhere these step-by-step instructions on what and how to do to make it bright and beautiful.
1. In order to draw the Universe, only 3-4 colors are enough. At least that's how much you can start with. Important: watercolor sheet should be very dense so that it does not wrinkle from water and so that the paint spreads nicely and evenly.

2. The outline can be drawn with a hard pencil to indicate the area that you will wet with water. Wet some of the allocated space.

3. Apply paint to wetted area. Try to keep the outlines nice.

4. Wet the rest of the space with water and paint a different color. Selectively make bright inclusions throughout the pattern. The drawing must be wet so that the paint spreads beautifully.


5. After the drawing is completely dry, apply the stars. This can be done with white or yellow paint using an old toothbrush.


6. Some stars can be drawn more carefully.

Photo for the master class from kitty-ink.tumblr.com.
If you sprinkle salt on a wet drawing, then the structure of the cosmos will turn out to be even more interesting. Salt will absorb some of the paint, and shaking it off after it dries completely, in place of the salt there will be beautiful white dots and clouds.
On our creative Instagram @miftvorchestvo we will regularly hold competitions for notebooks "642 ideas what to draw", "642 ideas what to write about" and "642 ideas what else to write about" (new!). Subscribe to be aware of everything creatively interesting and creatively fun.
P.S. Did you like it? Subscribe to our new newsletter. Once every two weeks, we will send 10 of the most interesting and useful materials from the MIF blog.
Drawing master class for preschoolers of the senior preparatory group on the topic: "COSMOS" in stages with a photo

Sredina Olga Stanislavovna, educator, head of the art studio of MDOU CRR d.s. No. 1 "Bear cub", Yuryuzan, Chelyabinsk region
Purpose:
Creation of educational, gift or competitive work
Materials:
Paper A3 white or colored double-sided, wax crayons, salt, gouache or black watercolor, soft brush No. 3-5
Goals:
Creation of works on the space theme
Tasks:
Teaching different ways of depicting space
Improving practical skills in wax crayons and watercolors
Education of patriotism.
Development of curiosity
Preliminary work:
1 We consider photographs of space depths.


2 We get acquainted with the history of cosmonautics, with the names and achievements of our outstanding cosmonauts. We remember the names: Yuri Gagarin, Valentina Tereshkova, Alexei Leonov. The world's first astronaut, the first woman in space, the first man to go into outer space. We look at photographs, talk about the difficulties and charms of the profession of space explorers. How did test pilots become cosmonauts? What kind of training did they have? We dwell in more detail on the first manned spacewalk.


2 - We think about space, UFOs, aliens. We discuss films and cartoons. We think what they can be - aliens: good or evil?
3 - Literary lounge:
Arkady Khait
In order, all the planets will be called by any of us:
One is Mercury, two is Venus, three is Earth, four is Mars.
Five is Jupiter, six is Saturn, seven is Uranus, followed by Neptune.
He is eighth in a row. And after him already, then,
And a ninth planet called Pluto.
V. Orlov
Flying in space
Steel ship around the Earth.
And though its windows are small,
Everything is visible in them at a glance:
Steppe expanse, sea surf,
Or maybe you and me!
Practical work No. 1: "Deep space"

To draw a cosmic landscape, we need stencils of circles of various diameters. You can use special rulers or various "improvised tools".

We draw several planets with wax crayons, placing them arbitrarily on the plane of the sheet. You can apply the technique of superimposing the near planets on the planets, or depict one of the planets only partially.

After creating a space composition, we crumple a sheet of paper, twisting it several times, and gently straighten it

Coloring the planets. So that the planets do not look like grandmother's balls with threads, we draw very carefully with crayons, do not go beyond the edges.
Before we start working in color, we remember how forests, mountains, deserts and oceans look from space, we think about whether all planets can look the same? Fiery and foggy, sandy, gaseous and icy - they can look absolutely fantastic. Coming up with complex color combinations.

We cover the entire sheet with black watercolor. Paint, accumulating in cracks, creates a mysterious depth of outer space.

Practical work No. 2: "Exit to open space"


For this work, we need a figurine of an astronaut in a spacesuit, circles of various diameters and a silhouette of a rocket.


All figures are placed on the sheet in random order. We start with a rocket and an astronaut. Then add the planets.


Inside the silhouettes we delimit the planes. We add portholes on the rocket, we divide the spacesuit into separate parts. We begin to color the rocket, the astronaut and the planets in stages. In order to create a festive atmosphere, we take bright, juicy colors.


Adding stars. We take yellow and white crayons. We place them in small groups, in the form of constellations, or line them up (like the Milky Way). Each star is a distant, distant sun, around which planets can revolve and there can be life on them.

We take a brush and black paint (watercolor or gouache) and begin to paint over the entire work. First we draw lines along the edge of the sheet, then we work along the entire sheet.


While the paint is not dry, we “salt” the drawing. In the place where a grain of salt has fallen, the paint seems to collect, and with the help of this technique, the cosmos again becomes deep and mysterious.


Children's work (5-6 years old)


Pattern options
Flying saucers (UFOs) can be very diverse. Turning on the fantasy, we depict the aircraft of aliens.
Most boys dream of becoming astronauts, while girls are interested in what space looks like. To make it interesting for both, we suggest learning how to draw space with a pencil or watercolor. We note right away that the images are simple, as it might seem at first glance, so elementary school students can handle the drawings quite well.
Drawing space with pencils
Earlier in our articles, we described, Now we offer to learn how to draw space on paper. To begin with, we will do drawing, pencils. This version of the image is quite suitable for beginner artists and children of preschool and school age.
Draw:

These are drawings on the theme of space, you can draw with pencils. If you follow the procedure and mix the shades of pencils correctly, you will get a wonderful picture with smooth transitions of shadows.
Space with planets in watercolor
We figured out how to draw space with pencils, but drawing with pencils for beginners is very difficult. So let's paint it with watercolor. Such works look no less beautiful, but the image process takes much less time, and even a preschool child can handle creativity.
Before starting the creative process, arm yourself with:
- watercolor;
- brush;
- water;
- palette;
- scissors;
- glue;
- salt;
- objects with round bases or compasses.
Let's get creative: 
- Take a brush and wet it with water. We cover the surface of the paper with liquid. Let the wet sheet stand for two minutes.
- Set the brush to blue. We paint the lower right corner and a small area in the middle. We wash the brush.
- We type blue on the brush a tone darker than the previous one. We paint near the blue, as shown in the picture. We wash the brush.
- We take a black shade. We work with the lower left and upper corners. Wash the brush again. Dip it in dark green watercolor and paint the distance between the black top corner and the blue area. How to draw space, or rather part of the image, we figured it out.

- Pick up the previous color again. We use it around the entire circle of the painted shades. Complement with a smooth transition with blue colors. Cover the area with black, as shown in the figure.
- Wash out the brush. We paint over the area at the bottom of the sheet with red. Using purple, cover part of the upper section. Blue complement the area with cherry blossoms. After wetting the brush, smear the top painted corner.
- With blue watercolor we circle the outline of the already depicted area. We sketch in black, the upper left corner and draw a line along the entire length of the upper side of the sheet. We dilute the image with blue paints to get a smooth transition of shades.
- We supplement the sketch with a dark green tone. Lilac make a smooth transition. Blue, paint over the rest of the upper part. We complete the bottom left corner with black.
- We collect a lot of black on the brush, bring it to the surface of the drawing and hit the brush with our fingers, so we get a lot of droplets, and the image will turn out to be more picturesque. We perform similar actions in red.
Wet the brush and smear all the paints. So we get smooth transitions of shades. We lift the sheet, and tilt it in different directions and at different angles. So, the shades mix well. These are children's drawings on the theme of space, preschool children can draw, but the drawing is not finished yet. - We wash the brush and type white on the brush. We bring the brush to the background and tap on it with our finger, during this we drive over the entire background. We collect salt and sprinkle the surface in a small amount. We remove the remaining salt, postpone the work. Let's decorate the drawing on the theme of space with planets.

- Now, we proceed to the second part of our drawing. We will. On a white sheet of paper, using objects with a round base of different diameters, we draw five different circles. Draw rings with a pencil to a medium-sized circle.
- We cover one of the small circles with red, this will be Mars. Paint the other circle blue, dilute the paint with a green tone, complement it with a yellow color. On the planet with rings, use a brush to draw stripes of an orange tint, as shown in the image.
- We complement the orange stripes with yellow ones. We collect mixed yellow and orange on the brush, paint the ring of the planet. Dark yellow cover part of the largest circle. We dilute it with brown paints. We draw our last planet in blue, dilute the color with a black tone and put dots of a yellow tint. At the end, sprinkle the image with salt.
- After the paints have dried, cut out the images with scissors along the contour. Shake off excess salt. We lay out the planets as you see them in space, if everything suits, we glue them in their places.
These are children's drawings on the theme of space, a child of preschool and school age can draw. If you are drawing for the first time, then to get the desired result, follow our step-by-step instructions.
The job is ideal if your child is starting to learn about the planets in school, or is simply interested in extraterrestrial expanses. Using the example of such a creative process, you can give him elementary, but interesting knowledge.
Space landscape in gouache
We figured out how to draw space with watercolors and pencils. In order not to stop there and consolidate the studied material, we suggest drawing a space landscape with gouache.
To get a high-quality and very beautiful drawing, we need:
- sheet for drawing;
- a container with water;
- brushes;
- palette;
- rag;
- round lid of the appropriate size;
- sponge.
Now, you can get to work. How our space landscape is drawn: 
- First of all, we choose the location of the planet. Having chosen a site, we cover with white gouache. We use a black tint. We paint over a part of the white perimeter. With a brush, smear the colors, thus making a smooth transition.
- We collect green on the sponge and begin to paint the upper part. Lubricate all the colors. Without wiping the green gouache from the sponge, we collect blue, paint over the green layer. So, a part of a children's drawing on a space theme is depicted.
- We close the planet with a lid or a round object of a suitable size, since we will further depict outer space. We will do this with the same colors that were used to color the planet.
- We apply white paint along the contour of the lid. We dilute the white color with green, make a smooth transition. As shown in the picture.

- Now, we combine green with blue. Color the top left corner black. We make a smooth transition from black to blue. Black cover the bottom part of the planet.
- . You can simply pick up white paint on the brush and drop the dots onto the base with finger strokes. So, we get half of the drawing on the theme of space. We continue creativity.
- We remove the cover from the planet. We work from a black outline, which is combined with blue. We depict sharp rocks with black paint, as we have in the picture.
We mix green and turquoise color with white. And on the rocks we depict light glare. This can be done easily with a brush or a special tool. We bring the lower part with white gouache.
- Below the white tone, we depict unearthly vegetation. We do this in zigzag stripes, but you can get creative and come up with your own plants. Let's complement the green color with a turquoise and yellow tint.
- We take black color and depict black stones immediately after the plants. Using the white color of the paints, we depict light reflections on the stones. We apply small waterfalls between the stones with blue paints. You can choose their location yourself, or you can focus on our picture.

- Lettuce color depict the lake in the lower part. After passing a few centimeters along the perimeter with green, we pick up the turquoise color of the paint and continue to depict the lake. It is important for everything to make smooth transitions of tones.
We finish drawing the lake with black paints. Here is a children's drawing on the theme of space is ready, but to make the picture more beautiful, we will add white drops near the fall of the waterfalls.
Now, the job is done.
After studying the material, you learned how to draw space with a pencil and watercolors. You have learned how to make a beautiful space landscape using gouache. All drawings are simple, so elementary school students and preschool children can easily cope with them. We suggest that you familiarize yourself with the materials that will tell you how to make children's crafts in and
Showing publications 31-40 out of 235 .
All sections | Space. Drawing classes, space drawings
Target: development of creativity and imagination through non-traditional techniques drawing, the formation of a positive-emotional attitude to beauty space. Didactic material: white cardboard, wax crayons, black gouache, wide brush, toothpicks, space melody...
 It's been a wonderful holiday "Day astronautics»
, the celebration of the first flight in space. In my group, I spent activity with children"Flying to space»
. Together with the children, we built a rocket that could be hit only if you guessed the riddle. Sitting comfortably inside...
It's been a wonderful holiday "Day astronautics»
, the celebration of the first flight in space. In my group, I spent activity with children"Flying to space»
. Together with the children, we built a rocket that could be hit only if you guessed the riddle. Sitting comfortably inside...
Space. Drawing classes, space drawings - "Journey into space". Abstract of a lesson on drawing in an unconventional way "blow into the tube" for the younger group
Publication "Journey into Space". Abstract of a lesson on drawing non-traditional ... "  "Journey into space". Purpose: To introduce children to a new non-traditional way of drawing “blow into a tube”. To consolidate the initial idea of \u200b\u200bchildren about space. Repeat words: space, planets, stars, rocket, astronaut, sun. Material: Illustrations: planets, starry sky,...
 MAAM Pictures Library
 Summary of the lesson on "Artistic and aesthetic development" in the preparatory group (6-7 years) Topic: "Fly, rocket, to the stars" Dominant educational area: Artistic and aesthetic Integration of educational areas: Social - communicative, cognitive, ...
 I remember the sun was sparkling that day: What an amazing April it was! And joy shone with pride in my heart: Gagarin flew from outer space! Inna Levchenko Dear colleagues! I bring to your attention a photo report on how we painted a portrait of Yuri Gagarin. I thought about drawing...
 Purpose: development of creative abilities through non-traditional drawing techniques. Tasks: educational: to improve the ability to work in the technique of scratching; continue to teach how to subordinate various expressive means (color, shape, technique, composition) to achieve integrity ...
Space. Drawing classes, space drawings - GCD for drawing in the middle group "Collective work" Fairy Planets "
 Tasks: - to introduce children to the new technique of drawing on salt; - continue to develop the skill of choosing beautiful color combinations to create a conceived image Material: - Whatman paper sheet with drawn outer space; - circles cut out of thick paper; PVA glue; -...
Presentation on drawing "Flight to the moon" Mankind will not remain forever on earth, but, in pursuit of light and space, it will first timidly penetrate beyond the atmosphere, and then conquer all the circumsolar space” K. Tsiolkovsky On April 12, Cosmonautics Day is celebrated in our country. On this day in 1961...