How to paint pictures by numbers with acrylics. Drawing by numbers as a hobby - Paintings for drawing by numbers. Tips for beginners. Where to buy a painting for coloring
The following tips will help you draw a picture so that you can be proud of your work, and at the end of coloring you can hardly guess that the picture is painted by this method (by numbers). The process itself can be divided into several stages. We will try to reveal to you the main secrets of this creation and to feel like a real artist.
Paint preparation 
Before you start drawing you need to carefully prepare the paint. The whole trick is that the paints do not require any mixing to get the desired shade and effect: everything is already completely ready and numbered, as the manufacturer took care of this in advance! In our sets, the colors are perfectly matched in color and are presented in the right quantity, so that your future masterpiece is guaranteed to be similar to the original, and maybe even better ;-) It all depends on you!
Opening vials
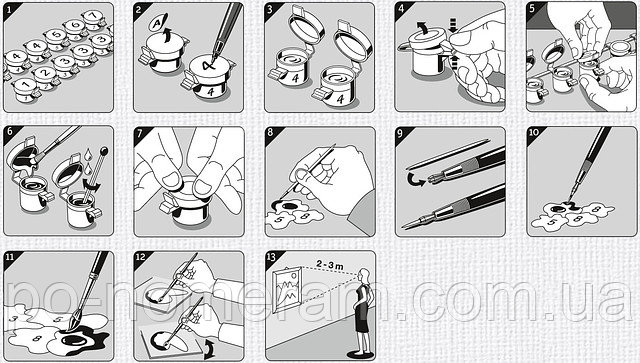
Open the paint bottles gently, without applying force - it can damage the bottle. To prevent paint drying, always open only those paints that you really need at the moment.
Drawing 
For convenience, place the following items near you: an image of the finished picture, paint, brush, canvas with a contour, a control sheet, a glass of water, a piece of cloth and a match for mixing paints. It is better to choose a place with good lighting. Circle large surfaces first with a thin brush, and then paint over the surfaces with a thicker brush. Make sure you fill in contour lines. It is considered normal if dark paint fills better than light. If the contours or numbers appear through, paint them several times.
How to hold a brush
Hold the brush like a pen. For stability, place your hand on the surface and turn the picture so that its location is convenient for you.
Drawing order 
There is no single approach to the order of drawing pictures. There are several drawing techniques:
You can draw a picture by the line-by-line method, from the top edge of the picture to the bottom.
However, you can achieve a better result by drawing from the “background to the front” method, first painting the objects in the background and then in the front. For example, you draw a landscape. In this case, the drawing order is as follows: 1. Sky, 2. Cloud, 3. Lug, 4. Trees, 5. Leaves, 6. Flowers.
Sometimes the question may also arise: to paint a picture by numbers or by colors? Empirically and empirically (Note: such conclusions are made by "practitioners" and are not official recommendations of the manufacturer) some users identified two options:
1) In the sequence of numbering inks in the set:
From the increase in the total number of areas and contours that need to be colored in one color, to a decrease. Example: paint No. 1 in a set needs to paint 15 contours, and paint No. 2 - ten contours.
From the larger total area of \u200b\u200bthe contours, which must be painted in one color, to a smaller one. This can be assessed visually "by eye".
2) In the sequence from lighter shades of colors to more saturated and darker ones. This is due to the fact that when there is an error in coloring, it is much more difficult to paint dark segments with light paint than light segments with dark paint. In other words, to paint a dark segment with white paint you need more layers and vice versa: you can paint a light segment with a dark paint in one layer, i.e. much easier.
For the perfect picture of the finished picture, fill in the unpainted areas and the translucent numbers. As in art galleries, it is necessary to look at the picture and evaluate it from a distance of 2-3 meters.
 Note to skillful artists
The effect of drawing can be enhanced by applying a different thickness of paint. To do this, apply the remaining paint with a thick layer on the elements of the picture that you would like to emphasize. This will make the picture relief effect.
Varnishing
Acrylic paints after drying get a light gloss and beautiful look. The surface of the picture can be wiped with a slightly damp cloth. Additional care is required. If desired, a week after the painting dries out, you can cover its surface with a special varnish for paintings. Glossy lacquer will increase the brightness of colors, and matte varnish removes glare. Varnish can be purchased at special shops for artists and craftsmen.
Placing the picture in the appropriate beautiful frame, it will become a real masterpiece! To preserve the effect of the picture, you do not need to place it under glass. You can decorate a picture with a usual frame, having bought it in self-service stores, or with a refined frame, having acquired it in specialized stores or galleries. The picture will look great and without a frame, if you additionally paint the end parts. Just continue drawing "around the corner" of the canvas on the end of the subframe and hang it as it is.
The secrets of using paints
To draw without problems, you must follow the rule of using paints. This is extremely important!
Important: as soon as the paint cans are open, the shelf life of the paint becomes limited!
Rule 1
Open paint cans just before you start painting. It is very difficult to pack quick-drying paints in such a small volume (about 3 ml), so that they can be stored for a long time. Once they are open, the paint can dry. Therefore, an amateur artist should complete the painting as soon as possible after opening the paint cans.
Rule 2
Using a brush, remove the adhering paint from the lid back to the jar. Boxes in a store or warehouse could be stored upright. Therefore, when opening a jar, some paint may be on the lid.
Rule 3
Despite the fact that the paint containers are tightly closed and specially designed to preserve all the properties of the paint, the paint in them may slightly thicken during storage, for example, due to temperature drops. To liven up the colors and use them again, simply add a couple of water droplets to them and mix thoroughly. Paints are ready for use again!
Rule 4
Once the paint cans have been opened, try to complete the picture without long interruptions. After the first opening of the jars, there is a chance that the paint can dry out. Therefore, after opening the paint cans, try to use them for a maximum of 12 weeks.
Rule 5
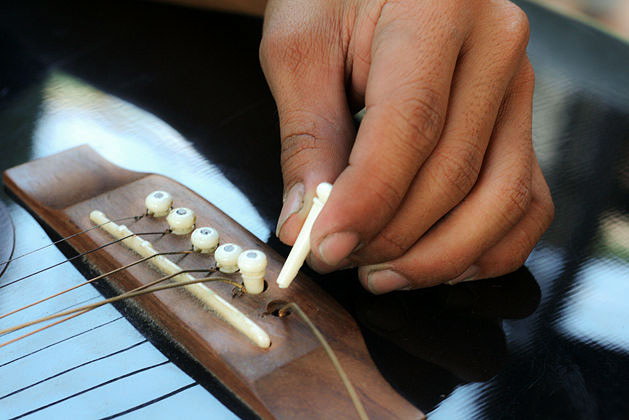
If you want to take a break from work, tightly close the containers, after removing traces of liquid or already dried paint from the cover itself, from the edges of the cover and sealing grooves of the cover.
Figures A and B show the principle
In Figure A, the container is airtight, since the edges of the container freely enter the clean sealing grooves in the lid. The lid is sealed to the edges of the jar.
Figure B is an incorrectly closed jar. It is seen that the remaining paint does not allow the lid to close tightly. Consequently, the air entering the container dries the paint. Therefore, thoroughly clean each jar before closing it. Remove residual paint from the edge of the container with a fingernail or cloth, and round sealing grooves with a toothpick or large needle. Before closing the jar, make sure that its edges and lid are clean.
Rule 6
If you plan to take a break from painting for several weeks, tightly close the paint jars as described above, then wrap them in a damp cloth and put them in a plastic bag or in a plastic box. This will help protect the paint from drying out. However, this cannot guarantee that already opened paints will remain ready for use and retain their properties for many months or years.
Rule 7
After each break in the drawing, the viscosity of the inks needs to be slightly adjusted to ensure its proper application. After all, paints contain water that quickly evaporates from open containers. Therefore, the paint slightly thicken. But it is easy to fix: add a few drops of water and mix thoroughly.
Secrets of brush care
In order for the brush to serve you for a long time and with high quality it is necessary to follow the following recommendations. Artists sometimes complain about the quality of the brushes. However, in most cases this is due to improper care of the brush.
The most frequent errors:
1. Do not leave the brush in a glass of water.
2. Never clean the brush with aggressive chemicals.
3. Never use a brush to mix paint.
4. Do not brush off the dried paint with your nails.
Proper care:
Do not give to children - contains small details!
In the process of preparing the article was used information from the sites:
http://picaso.by/story/sovety-po-raskrashivaniyu, http://kartina123.ru/index.php?route\u003dinformation/information&information_id\u003d5
1) Drawing rules and sequence
2) Terms of use of paints
3) Rules for the care of brushes
Of course, in this article it is impossible to tell and describe all the nuances that exist, as painting is a real art. We simply tried to summarize the practical experience of drawing, together with the recommendations of various manufacturers, and present it in the most accessible form. So:
Drawing sequence rules
Paint preparation
Before you start drawing you need to carefully prepare the paint. It is important to note that no mixing of colors is required to obtain the desired shade and effect: everything is already fully prepared and numbered, since the manufacturer took care of this in advance! In our sets, the colors are perfectly matched in color and are presented in the right quantity, so that your future masterpiece is guaranteed to be similar to the original.
Pay attention to the numbering of colors in containers
When drawing by numbers, it is imperative that the numbers on the containers match the numbers on the canvas. Some scenes involve the use of multiple containers with the same paint color, respectively, these paints have the same number. Therefore, the numbering sequence is as follows:
Opening vials
Open the paint bottles gently, without applying force - it can damage the bottle. To prevent paint drying, always open only those paints that you really need at the moment.
Drawing
For convenience, place the following items near you: an image of the finished picture, paint, brush, canvas with a contour, a control sheet, a glass of water, a piece of cloth and a match for mixing paints. It is better to choose a place with good lighting. Circle large surfaces first with a thin brush, and then paint over the surfaces with a thicker brush. Make sure you fill in contour lines. It is considered normal if dark paint fills better than light. If the contours or numbers appear through, paint them several times.
How to hold a brush
Hold the brush like a pen. For stability, place your hand on the surface and turn the picture so that its location is convenient for you.
Drawing order
There is no single approach to the order of drawing pictures. There are several drawing techniques:
1) You can paint a picture by the line-by-line method, from the top edge of the picture to the bottom.
2) However, you can achieve a better result by drawing from the “background to the front” method, first painting the objects in the background and then in the front. For example, you draw a landscape. In this case, the drawing order is as follows: 1. Sky, 2. Cloud, 3. Lug, 4. Trees, 5. Leaves, 6. Flowers.
Sometimes the question may also arise: to paint a picture by numbers or by colors? Empirically and empirically (Note: such conclusions are made by "practitioners" and are not official recommendations of the manufacturer) some users identified two options:
1) In the sequence of numbering inks in the set:
from increasing the total number of areas and contours that need to be colored in one color, to decrease. Example: paint No. 1 in a set needs to paint 15 contours, and paint No. 2 - ten contours.
from the larger total area of \u200b\u200bthe contours, which must be painted in one color, to a smaller one. This can be assessed visually "by eye".
2) In the sequence from lighter shades of colors to more saturated and darker ones. This is due to the fact that when there is an error in coloring, it is much more difficult to paint dark segments with light paint than light segments with dark paint. In other words, to paint a dark segment with white paint, you need more layers and vice versa: you can paint a light semgent in one layer with dark paint, i.e. much easier.
As you can see, there are many variations and interpretations of the coloring technique by numbers. Various combinations and alternations of techniques and methods are also possible, which gives us an infinite number of options. In other words, you are absolutely unlimited, except for your imagination, desires and skills. You should not get stuck on anything: you need to draw as you want, pleasantly and comfortably. Just start painting a picture and in the process you will see for yourself what technique and method of drawing you are most pleasant and comfortable.
For the perfect picture of the finished picture, fill in the unpainted areas and the translucent numbers. As in art galleries, it is necessary to look at the picture and evaluate it from a distance of 2-3 meters.
Note to skillful artists
The effect of drawing can be enhanced by applying a different thickness of paint. To do this, apply the remaining paint with a thick layer on the elements of the picture that you would like to emphasize. This will make the picture relief effect.
Varnishing
Acrylic paints after drying get a light gloss and beautiful look. The surface of the picture can be wiped with a slightly damp cloth. Additional care is required. If desired, a week after the painting dries out, you can cover its surface with a special varnish for paintings. Glossy lacquer will increase the brightness of colors, and matte varnish removes glare. Varnish can be purchased at special shops for artists and craftsmen.
Placing the picture in the appropriate beautiful frame, it will become a real masterpiece! To preserve the effect of the picture, you do not need to place it under glass. You can decorate a picture with a usual frame, having bought it in self-service stores, or with a refined frame, having acquired it in specialized stores or galleries.
Terms of use of paints
To draw without problems, you must follow the rule of using paints. This is extremely important!
Therefore, we ask you to carefully read the following rules and follow the instructions for drawing.
Important: as soon as the paint cans are open, the shelf life of the paint becomes limited!
Rule 1
Open paint cans just before you start painting. It is very difficult to pack quick-drying paints in such a small amount (about 3 ml), so that they can be stored in the store for a long time. However, as soon as they are open, the paint can dry. Therefore, an amateur artist should complete the painting as soon as possible after opening the paint cans.
Rule 2
Using a brush, remove the adhering paint from the lid back to the jar. Boxes in a store or warehouse could be stored upright. Therefore, when opening a jar, some paint may be on the lid.
Rule 3
Despite the fact that the paint containers are tightly closed and specially designed to preserve all the properties of the paint, the paint in them may slightly thicken during storage, for example, due to temperature drops. To liven up the colors and use them again, simply add a couple of water droplets to them and mix thoroughly. Paints are ready for use again!
Rule 4
Once the paint cans have been opened, try to complete the picture without long interruptions. After the first opening of the jars, there is a chance that the paint can dry out. Therefore, after opening the paint cans, try to use them for a maximum of 12 weeks.
Rule 5
If you want to take a break from work, tightly close the containers, after removing traces of liquid or already dried paint from the cover itself, from the edges of the cover and sealing grooves of the cover.
Figures A and B show the principle:
In Figure A, the container is airtight, since the edges of the container freely enter the clean sealing grooves in the lid. The lid is sealed to the edges of the jar.
Figure B is an incorrectly closed jar. It is seen that the remaining paint does not allow the lid to close tightly. Consequently, the air entering the container dries the paint. Therefore, thoroughly clean each jar before closing it. Remove residual paint from the edge of the container with a fingernail or cloth, and round sealing grooves with a toothpick or large needle. Before closing the jar, make sure that its edges and lid are clean.
Rule 6
If you plan to take a break from painting for several weeks, tightly close the paint jars as described above, then wrap them in a damp cloth and put them in a plastic bag or in a plastic box. This will help protect the paint from drying out. However, this cannot guarantee that already opened paints will remain ready for use and retain their properties for many months or years.
Rule 7
After each break in the drawing, the viscosity of the inks needs to be slightly adjusted to ensure its proper application. After all, paints contain water that quickly evaporates from open containers. Therefore, the paint slightly thicken. But it is easy to fix: add a few drops of water and mix thoroughly.
Brush Care Rules
In order for the brush to serve you for a long time and with high quality it is necessary to follow the following recommendations. Artists sometimes complain about the quality of the brushes. However, in most cases this is due to improper care of the brush.
The most frequent errors:
1. Do not leave the brush in a glass of water.
2. Never clean the brush with aggressive chemicals.
3. Never use a brush to mix paint.
4. Do not brush off the dried paint with your nails.
The brush consists of three parts: a handle, a metal fastener and a fleecy part.
1. After painting, immediately wipe away any paint residue from the brush.
2. Wash the brush in clean, warm water.
3. Gently soap the brush, and then rinse it again.
4. Wipe the water off the brush with a rotating motion. The paint should not remain on the end of the metal fastener.
5. Using your fingers, give the fleecy part of the brush its original shape, forming a tip.
6. Put the brush and let it dry on its own. Do not use a heater or hair dryer!
The most important rule - do not be afraid! Paint in pleasure, Everything will work out! Successful to you coloring and shopping!
“Anyone can become an artist!” - today this motto is as relevant as ever. Yes, yes, do not be surprised, nowadays anyone can feel inventive Leonardo da Vinci or expressive Van Gogh. After all, this is before in order to write your canvas, you had to study at an art school for years, or at least complete expensive painting courses. And everyone, regardless of gender and age, can create his own still life, portrait or landscape in just 3-5 days, just like a real master exhibited in famous galleries.
What is the reason for this phenomenon? In the paintings by numbers, which are gaining increasing popularity in the 21st century. After all, they allow you to unleash the creative potential of all those who crave it, even if they do not have enough experience or free time.
We draw on the principle of "all inclusive"

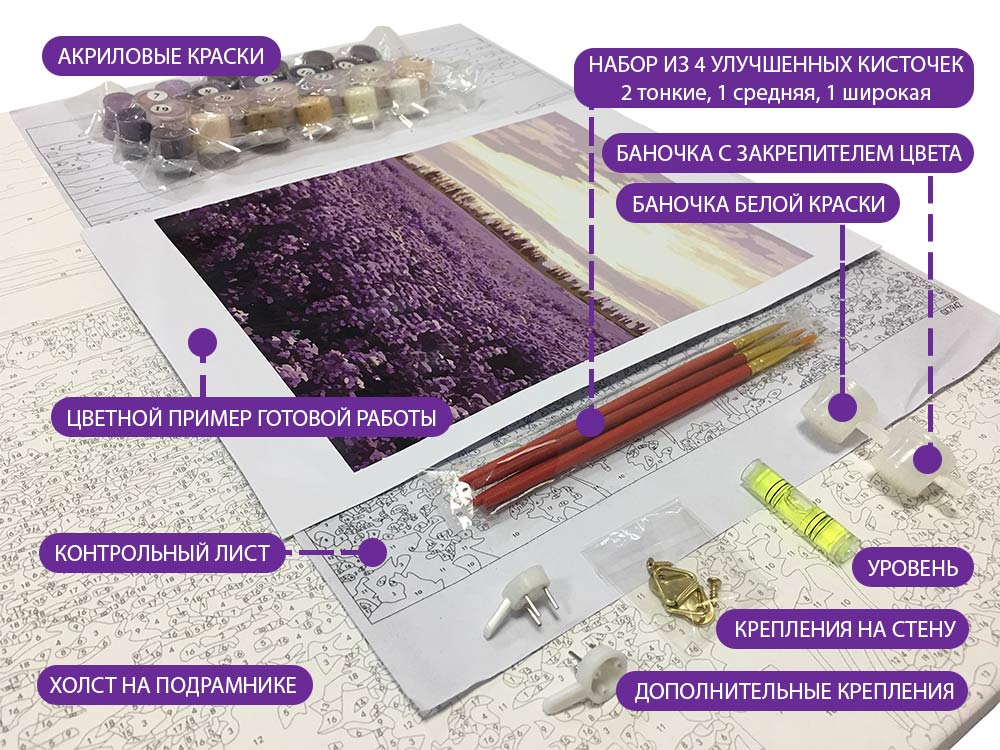
What is especially nice is that everything for home painting already includes everything you need: numbered jars of paint, one or more brushes, instructions, a checklist for checking hues, divided into sectors and marked with cardboard or canvas with a frame, paintwork and wall mounts for the finished picture. You can immediately start creating! But first you need to choose the desired basis of the picture and get acquainted with the live hacking by coloring.
Cardboard vs canvas


Experienced draftsmen by numbers consider that it is worth starting with cardboard. After all, this material is very cheap, but it is able to absorb the excess paint applied to it, which is important for beginning artists. That's just the cardboard does not give the paintings of the texture and "authenticity", which gives the canvas: slightly rough to the touch, already primed and stretched on a real stretcher. The canvas, in turn, is produced with a monochrome numbered outline or color. The latter type of canvas is suitable even for elderly and visually impaired people, as well as children, because Coloring becomes intuitive. It is better to start with small formats and understandable subjects: animals, fish, birds, landscapes, nature or flowers. But to draw people, angels, icons or complex architectural structures should go after the development of the basic techniques of room painting.
By the rules or without?
Of course, contemporary art no longer has clear instructions “can” and “cannot”, and the rules of modern art exist solely to break them. But for this they need to know a little, and therefore, before proceeding to unpack the cherished boxes with canvas and colors, it is worthwhile to study the Internet encyclopedias to learn or refresh the concepts of light and shadow, line and shading, perspective and plane, front and the background, color separation and contrast ...
And if you are still new and do not have the experience of creating paintings by numbers, it is better to follow the instructions in each set exactly. And when you master the basic techniques of this kind of painting, you can already turn out the baggage of your receptions and chips. Moreover, the main techniques that greatly facilitate the drawing, not so much.
"The Magnificent Four" methods of painting pictures by numbers
There are 4 principles for painting the canvas. You can easily remember them, because they are unusually logical and functional, and so any person who draws them will be informed by common sense and convenience.
From light to dark
Painting the white, yellow, blue or pink areas at the very beginning, you will avoid random blots. After all, it is much easier to erase or block a pastel shade with a different color than a bright or dark color.

If you paint all the large details of the picture at the very beginning, then you will not only avoid the above-mentioned blunders and blots, but you will then be able to correctly arrange the nuances and draw small details, put the correct strokes and highlights. So it will be easier to compare the "small things" with the main semantic spots of the picture: agree that by painting the vase and the three largest buds in it, it will be easier for you to place the small flowers and the leaves of the bouquet next to them.

Moving in this direction, you definitely will not smear the sleeve on your shirt or elbow on the drawing that was already applied to the edge. As a rule, it is in the middle of the picture that the classical artists have the main image, whether it is a hut in a pastoral landscape or a bowl of fruit in an appetizing still life.

How to hold a brush and make strokes?

Brush easier and most convenient to hold just as you hold a ballpoint pen. Your hand must be supported. This is enough so that you do not get tired, and the picture turned out neat. For a start, it is worth learning the usual strokes: just try to paint over each numbered fragment as smoothly as possible, making smooth movements with a brush from left to right (if you are right handed), putting paint in the same thickness of the layer without leaving the outline.
Once you have mastered this, you can experiment with layer thickness, shading, and even dot painting, if required by the artistic intent. For example, if you want to draw a heavy and water-saturated rain cloud. After all, its lower part is rough and dark, which is well conveyed by small ripples of dots, and below there are threads of rain that are easiest to imitate with short oblique strokes.
Bright mix: how to mix colors?
As a rule, there are already mixed colors in a set, that is why there are so many numbers in it, because each of them means a certain shade, which sometimes differs only by a fraction of a tone from the previous one. If in the process of drawing you finish the desired color, it is quite possible to mix it yourself from the existing paints. Usually, the light tones end up first, because there are usually more light spots in the picture than dark ones, and therefore you just need to slightly dilute the white color with the tone that is closest in shade to the one you need. It is best to do this on a palette or a sheet of cardboard, and not directly in a jar, so as not to accidentally spoil the whole mass of paint.
Effective and spectacular: blurring the boundaries
This is amazing, but only with two methods - creating clear or blurred boundaries - you can give the picture both depth, expressiveness, and professional appearance. To understand where it is worth making the most accurate contour, and where to slightly smear the edges, it is enough to carefully examine these places on the sample reproduction.
Here is the shine: 3 unique types of varnishing
When the picture is ready, you will probably want to give it a gloss and keep it from dust, cracking and fading, covering it with a transparent protective base.
Matt Acrylic lacquer is good because it dries extremely quickly, and also gives the colors extra brightness. Literally in a couple of 6-8 hours after the painting is covered, you can proudly hang it on the wall and invite family and friends to your own opening day.
Glossas the name implies, gives the image a special shine and smoothness. This is a plus, if you want to smooth out some rough edges, but a minus, if you want to emphasize the volume. With the imparting of invoice better copes the above matte.
Craquelure truly magical: it allows you to instantly age a completely new picture for a moment, covering the surface with a network of bizarre cobwebs, turning a newly created portrait or landscape into elegant antiques.
Auxiliary materials
Before starting work, you should cover the table with a newspaper or a wrap, install bright but not striking lighting, and also stock up with toothpicks and cotton buds. The first will help draw even the thinnest lines, and the second will be useful in order to remove excess paint in time or correct a bad brushstroke. You may additionally need a set of brushes of better quality and different diameters, a palette and even an easel if you are going to paint in nature or a country house.
Do not forget to put a non-spill bottle on the table and put disposable napkins. But do not rush to immediately open all the cans of paint: acrylic thickens quickly, so open them in stages, number by number.
Frame for man-made masterpiece: choose the perfect frame
Acrylic perfectly imitates a classic oil paint, and therefore it is worthy to decorate a finished painting. A textured, slightly deeper and gilded or silvered baroque frame will suit almost any plot: with fine draws, vignettes or grape vines. After all, then the image will acquire the proper volume and will be a worthy decoration of your home art gallery!
Bought a picture, and can not wait to get down to work on it faster? Absolutely right, no need to postpone creativity until later. The hand-made market is regularly replenished with new products, offering needlewomen more chances to translate their talents and hidden opportunities.
Craftswomen with experience in drawing, note that the choice of paintings and techniques of painting it plays a role in the process of drawing.
Before you start coloring by numbers, explore 6 simple but important points that will help you draw a real man-made masterpiece!
- Buy kits for painting by numbers only in verified specialized stores (here in this store there is a good selection of colorings and decent service). This will help eliminate problems with the quality of components.
- Do not hurry. Before painting, try out the resulting color (if using mixed ink) on a sheet of paper or cardboard. Haste is a bad adviser in such a delicate matter as art. Experiment with a palette, combine colors, dilute them, invent something unique, your own.
- Choose a technique for yourself. A sketchy and chaotic shading will confuse you and most likely will not give the expected result. Therefore, read the instructions, the procedure for painting a fragment of this picture and the recommendations of the manufacturer.
- Draw should be comfortable. If you are a happy owner of an easel - there is no doubt that the artistic process will be comfortable for you. But more modest artists better to free up the surface of the desk and work in a position where the picture is fixed horizontally.
- Be careful. Many creative people say that it works much better under the "purr" of the TV, favorite series or just radio. It's true. But do not relax too much! The wrong color on the picture can ruin the whole process. Before using paints, make sure they match the number printed on the canvas.
- Patience. Work sometimes does not go as fast as we would like. Remember that the greats of the world have been working on paintings for years. The main thing is quality work, not a stopwatch, counting the time spent on drawing.
Drawing pictures by numbers is a lesson, not only for children. Did you know that students of Leonardo da Vinci himself used this technique? Yes Yes! Apprentices painted over fragments of Leonardo's works according to the sketches he made. Therefore, not a lot, not a little, you are joining a truly high art. That deserves only praise. Any creativity is able to paint the world with bright colors, and if it comes to drawing, then it is you who need to paint everything around. And what color will be your today or tomorrow's mood - it only depends on you! Take the brush in your hands and start art!
Ways of coloring colorings by numbers
Technique drawing pictures by numbers
Painting the most difficult, and the numbers are easy - true or not? Now we find out! Surely, seeing the picture by the numbers, many people ask themselves the question: “How difficult is it to paint it?”. In fact, coloring pictures by numbers is a simple task. If you do not go into details, then all that is needed to obtain the final result is to paint over all the numbered areas in the picture with paint with the specified number. As some novice artists sometimes make mistakes when painting pictures by numbers.
Of course, questions from a person who first took up painting a picture will cause quite a few questions:
- what areas to start the coloring process
- where exactly to start from
- what colors (light or dark) to paint in the first place,
- which brushes and in what situations to use (the kit includes several different brushes).
It is difficult to give an unequivocal answer to all the questions that arise, since the process of painting a picture is individual, and, as a rule, everyone chooses for himself the most optimal way. In the process of painting pictures, each artist over time develops his own individual style, which will continue to determine that maximum of positive emotions derived from this fascinating creative process.
In the sets there are: canvases stretched on stretchers, contours, brushes, paints. All the rest is solely your process, from which you will receive maximum pleasure.
However, it would be advisable to advise seemingly simple, but at the same time very useful techniques of drawing pictures by numbers!
Little secrets and tricks:
1. From which areas to start the coloring process, from which angle to start:
- Practice at the beginning on large areas of coloring in order to understand how paints lie down, how to work with a brush and how paints behave on a canvas. It will be more convenient to start painting the picture for the right-handed person from the upper left corner and further to the right and down, why? Because you do not get dirty yourself and do not spoil the picture, hooking the painted area with a sleeve with this approach. For left-handers, respectively, you need to start from the top right corner of the picture by numbers.
- If the light and dark colors are near or even intersect, it will be much easier to first apply the light colors along the contours, and then paint the areas next to them with dark colors. Even if you miss a little, it's not scary. It is also possible to paint over the dark areas with light paints, but it is much more difficult and you will have to apply several layers so that the dark ones do not shine through under the light ones.
- Use for large areas - a large brush, and for point and small areas a brush with a thin tip.
The technique of painting pictures by numbers
In general, more experienced artists identify two main methods for painting pictures by number: the line-by-line method and the back-to-front method.
Let us consider in more detail both methods.
- Line-by-line method - The picture is painted from the top to the bottom. This method avoids the smudging of paints by hand. Such lubrication will be obtained if you paint a picture on the contrary, that is, from the bottom up. Large areas are painted over first, then smaller ones.
- Method "from the background to the front" - the artist selects for himself the background items and paints them in the first place, then he goes on to paint the foreground objects. But this method has the same disadvantage, which has already been mentioned - since unpainted foreground objects may turn out to be higher than those of the back, then random smearing of colors is possible. For this reason, drawing pictures by numbers in a way “from the background to the front” is recommended to more experienced artists.
After coloring the whole picture, check it for the numbers and contours through the layer of paint. If you notice translucent markings, carefully apply another layer of paint of the same number. Also, applying additional layers of paint will be needed to give the desired volume of objects and the finished picture will look like a relief.
In the pictures according to the numbers of our manufacturer - PaintBoy, all the plots are presented with sets of acrylic paints without mixing.
Drawing on numbers on canvas without mixing colors is no less fascinating process, but no less complicated, although many will say that it is not. In fact, coloring without mixing sometimes comes with up to 40 or more acrylic paints. It's just that the manufacturer has already done all the mixes for us. And such complex colorings have very small details on the canvas, because the more colors, the more different areas and they become strongly small sizes. But do not despair - because the harder the canvas, the more impressive the result you get!
Dear friends, draw on health!