How to draw a big house. Designing a house yourself: creating a house project


A Russian hut, a hut, a house in a village, a natural landscape depicting wooden houses are the subject of inspiration for many artists. It is easy to depict a Russian hut by drawing simple lines and geometric shapes, so a child can draw it. And if you add more realistic details, shadows and perspective, you can create a real masterpiece. In this lesson we will learn how to draw a Russian hut outside and inside with all its components. So, let's begin!
Hut outside
To begin with, we will learn how to draw a Russian hut outside in stages. For clarity, each new detail in the image will be highlighted in red. You can do all the work with a simple pencil.
Stage 1
We draw the general outlines of the future house. Two oblique lines at the top are the roof, and three lines are the foundations and walls of the house.
To get it symmetrically draw a vertical line through the top of the roof and the middle of the base of the house. Next, build lines to the right and left relative to the center.

Stage 2
Now let's move on to the roof indicated above in red. Let's circle the lines as shown in the picture.

Stage 3
Every home has a foundation on which the rest of the structure stands. Let's draw the base in the form of a rectangle.

Stage 4
To make it clear that the house is made of logs, draw circles located one above the other near the right and left walls.

Stage 5
Traditionally, one or two windows are drawn in the image of a house. And as we look at the house from the front, we see the third window of the attic, sharpened from above in the shape of the roof.

Stage 6
Let's draw the shutters in the form of rectangles and draw the attic windows, as shown in the image below.

Stage 7
Let's draw two main windows. Drawing windows will be described in detail later in this tutorial.

Stage 8
The windows in the Russian hut were decorated decoratively. They painted flowers on shutters, nailed patterns carved from wood. Draw decorative planks over the windows, as shown in the figure. And, of course, what kind of hut is without a pipe - let's draw a pipe.

Stage 9
Let's depict the plank and stone surface of the house.

The house is ready! It looks interesting.
Draw with a pencil
There are techniques for drawing with a pencil, so in this part of the lesson we will separately consider how to draw a Russian hut with a pencil. Use the basics of construction from the first part of the lesson, add details from your imagination, swap them, the main thing here is to depict the house with a pencil.
We draw the general outlines of the house with a thin line.

We outline the lines of the roof, as shown in the picture. You can press harder on the pencil, or overlay one stroke on another.
Better to circle at the end of the drawing, in case you have to erase with an eraser.

Draw windows and logs over the wall line.

We draw the details: shutters, pipe, boards and threads on the cut of the logs.


The surface of the logs is rounded, so a shadow forms at the junction between them. Draw the shadow with light shading.

A glare forms on the protruding part of the logs - this place should remain light. Paint over the twists of the logs so that the shading is a little lighter than the shadow. This will give the volume.

Now we will complete the drawing. In the same way, as shown above, we will depict chiaroscuro on the windows, roof, pipe and other details that will be in your drawing. We will depict the sky and the grass with strokes - the closer to the viewer, the less often the grass will be, and vice versa. You can experiment, the main thing is that the lines are light and confident.
The decoration of the Russian hut
In this part of the lesson, we will learn how to draw a Russian hut inside.
Create perspective. Draw 2 rectangles, one inside the other, and connect the corners as shown in the picture. The size and position of the rectangles depends on what kind of room we want to end up with.

We arrange objects. In the Russian hut we see a stove, a bench, shelves for dishes and other things, a cradle, a spindle and an icon. To correctly arrange objects in perspective, you need to draw lines parallel to the main ones shown above. It is not difficult, the main thing is to draw the lines exactly and imagine how it will look as a result.


Add chiaroscuro to the finished room. Imagine where the light comes from and which surface remains light. Let's see in what places the shadow from objects will fall. To show the wooden surface inside the house, we depict the relief of the board due to the shadow.

Red corner
The red corner in the Russian hut is a place with an icon of a table and a bench. Let's see how to draw the red corner of the Russian hut.
Draw the room in perspective, as shown above. Add a table and a bench to the room.

In the corner of the room, closer to the ceiling, draw a rectangle - this will be an icon. Draw an arc from the bottom of the rectangle, draw a circle on top and paint over the background around them. We draw a shelf under the icon. If you wish, you can draw the icon in more detail.

Bake
It remains to consider in detail how to draw a Russian stove in a hut and windows. We draw a stove.
We draw the oven according to the laws of perspective described above.

We draw a stove with small details.

Professional drawing.

Window
In conclusion, let's see how you can draw the window of a Russian hut.
The carving on the windows can be a pattern, or any other image. Can be part of the shutter, or attached separately.

Threads can be in volume, projection, or flat.

For drawing a window, you can take into account the season in order to depict drawings on shutters similar to the weather, patterns on glass from frost, if, for example, it is winter. You can connect a pattern with a finished thread.

Everyone wants to have their own refuge in order to hide there from this world. I will tell you how to draw a house using a pencil. Perhaps in the future you will be able to build your own cozy shelter. The house is the permanent abode of people and all the good they have acquired in the form of a TV, unlimited Internet and a cat. It is carefully taken care of by the owner, insulated for the winter and serves as a venue for cultural events. On the territory of Rashka, most often it is a communal apartment in a Khrushchevka, less often - an apartment in the center of Moscow or Bobruisk. In places remote from civilization, it can be a two-story shed with a leaking roof. It brings a loss in the form of constant European-quality repairs and communal tribute, needs expensive armored doors to protect property and add beauty outward appearance... Grants protection from acid rains and hurricanes of petty brawls, as well as from gypsies, agents of Ayvon, and Jehovah's Witnesses. A specific type of houses:
- Madhouse (synonyms: psychiatric hospital, psychiatric hospital, Kashchenko) - The habitat of creative and talented people... Equipped with equipment for conducting experiments on people healing and healing the soul. Accommodation by special invitations.
- The White house . A pumped-up version of the usual madhouse for the elite of this world. Led by the Black Lord, he spreads democracy throughout the world, absolutely free, preference is given to countries with oil and dangerous terrorists.
- House-2 is almost the same as a madhouse, only there the patients are also paid money.
Now let's create a project for your home.
How to draw a house with a pencil step by step
Step one. We draw a small standard house, as it looks in the village, with a triangular roof.  Step two. Align the building a bit, add some formal bushes around it, and tweak the edges of the roof.
 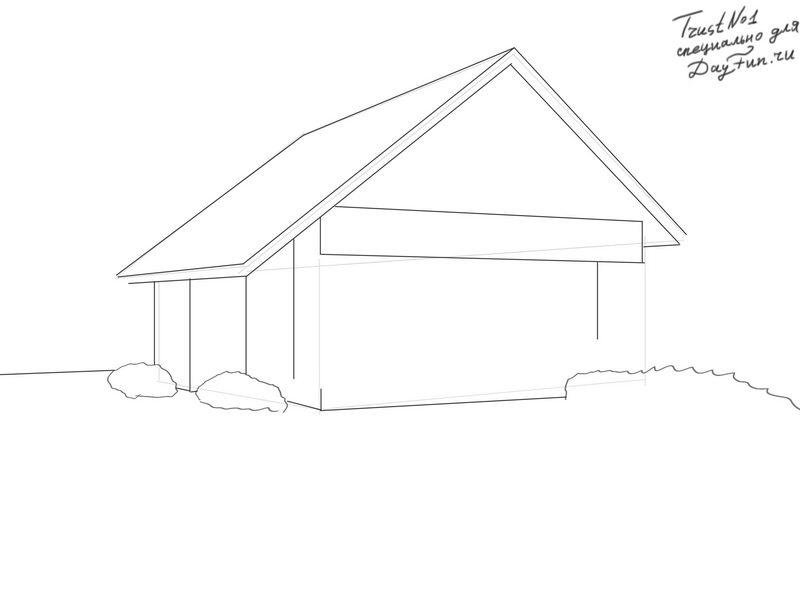 Step three. Let's add a design to this hut, a beautiful porch and a facade ornament.
  Step four. Now we will draw several windows in the front on both floors, as well as several pieces from the side. You also need some trees in the background and a path to the entrance.
  This is how my house will look, and what kind of house would you like to build? Draw and attach your artwork below under this article. It will be useful for you to find out more.
Fairy-tale houses differ from our houses in that they can be funny and unusual, colorful, crooked, very small and ogreous, and sometimes even edible, or vice versa - poisonous. Let's try with you draw a fairy house, in which gnomes could live, and we also learn how to draw a house in the form of a Christmas gingerbread... How do you like the idea? Like? Let's go then!
I have prepared for you several options for fairy-tale houses. One of them is in the video.
How to draw a house for gnomes step by step
You can also slightly indicate where the walls will end and the roof will begin.
2. Let's draw the walls and the roof. The most interesting thing in the process of creating a drawing of a fairy-tale house is that you can draw walls and a roof of any shape, the main thing is to fantasize as much as possible and make the house original.

3. If the main elements of the house are ready, it's time to take care of the windows and doors, because the fairytale house should not only be funny and original, but also serve as a cozy home for the gnomes. Windows and doors can also be of various shapes: curves, round, oval, square. In short, fantasize!

4. Now you can go to the details. Let's mark the patterns on the roof, which will remind us of the tiles, and draw the brick walls.

5. Let's add a few more details to the drawing of the house: a chimney, as well as a flashlight, so that at night the gnomes are not afraid to return home. Now let's draw the background elements: bushes, trees, flowers, clouds.

6. Congratulations! The fabulous house is ready! Color it in bright colors using pencils or paints. Color can make the drawing of the house even more fantastic and original.

How to draw a Christmas gingerbread house
1. First of all, think about placing the house on paper. Let's mark the extreme top and bottom points of the picture and match them with a central line. It will help us maintain symmetry.
Also on the center line, mark where the walls will end and the roof will begin. For convenience, you can draw a horizontal line through the marks.

2. This house will look a little more like the houses in which people live, so let's try to build it from the geometric shapes familiar to us first. The rectangle is for the walls, the triangle is for the roof. Also note doors and windows. Now this house looks like an ordinary one, but we will add fabulousness to it.

3. Draw two caramel columns on the sides to the walls, make the roof in the form of glaze flowing down onto a small window. Also at this stage we will draw in detail the windows and doors.

4. All the basic elements are ready, let's move on to the sweet details? Decorate the drawing of the house as you want. For example, I decorated my house with garlands with various sweets. And added caramel stones to the bottom for decoration.
At this stage, you also need to finish painting the background elements. Our house is Christmas, so the background should be winter: snow, Christmas tree and the like.

5. Congratulations! The sweet Christmas house is ready! Color it with crayons, or paints, if you wish. Success in creative work!
Before you start drawing a house, you need to take a close look at it: whether it is high or low, where the door is located, how many windows there are in the house, how many floors. Let's pay attention to the roof of the house. We will start the work by drawing the general shape of the house, from its facade (that is, the view of the house when you look at it directly and see only one wall and roof). We outline the height and length of the house, the size of the window and its location. We will do the same with the door. Make sure that the lines of the windows, the lower edge of the roof and the base of the house are horizontal. Windows can be drawn in the form of cells in straight lines from top to bottom and from left to right.
Toy house
And you can also draw such a house. It looks like a toy.

Multi-storey building
If we are drawing a multi-storey building, then we will notice that the windows are on the same vertical line (the top row above the bottom). In addition, all windows on one floor are usually at the same height, on the same horizontal line.
What is the best way to place the house on a sheet of paper so that it is not very small: the length of the sheet or the width?

When we draw people, we will think about what size they should be compared to the house. Look at the drawings and tell me where the artist drew correctly and where not.

Hello everyone interested in mine! Today we have a very interesting lesson, which I think everyone will like and will find useful! But first, you should subscribe to VKontakte community so you can share your work, get tips and new lessons!
Let's take a look at where we are now on our thirty day journey. You mastered the art of drawing, and most importantly, you learned how to use the direction compass (I talked about it in detail in the cubes lesson). Now you will use these skills to draw even more real objects. In this chapter, you will learn how to start drawing a house, then you will draw a letterbox.
1. Draw a cube with a very, very light touch of the pencil.

2. Place an anchor point in the middle of the bottom right side Cuba.

3. Draw a very easy vertical line upward from this point. This will be our guideline for creating the roof of the house.

4. Connect the front roof rails. Note that the near slope is longer than the other side. This is a great example of how size and position add depth to a drawing. The near part of the roof is longer to make it bigger and give the illusion that it is closer to the viewer.

5. Using the lines that you have already drawn as a guide, draw the top of the roof, be careful not to lift the line too high (like here):

This is a problem for many newbies. To avoid this, deliberately and deliberately return to your first line drawn in the northwest direction.

6. Draw the far side of the roof by matching the slope to the front edge. When I paint at home, it seems to me that if the far edge of the roof is tilted a little less than the near, it looks more realistic.

This is just a quick glance at a two-perspective perspective. In the future, we will get acquainted in more detail with the law of perspective. I just want to play out your appetite for new drawing challenges!

See how fun it is to see a house lined up with a compass in the northwest and northeast directions and see how these lines merge at the vanishing point on each side of the object. In fact, you've already used this advanced science of two-perspective perspective effectively without even knowing it! How? When? You ask…
But I am typing on my laptop, having absolutely no idea how it actually works. You can also drive safely without understanding how the engine works. Likewise, you can (and should!) Successfully learn how to draw basic shapes without realizing all the laws and regulations. I am not saying that you shouldn't learn the basics of foreshortening in drawing, because you should, and you will in the following tutorials. But the immediate introduction of excessive, tedious information can greatly interfere or completely block out beginners' enjoyment of drawing the initial basics. When newcomers are overwhelmed with information, they become anxious and naturally get frustrated. They fail and accept the completely false assumption that they have no talent and therefore have no opportunity to learn to paint. The truth is that learning to paint has nothing to do with talent. You have experienced this for yourself by doing these lessons.
The best way to introduce students to the thrill of 3D drawing is by offering IMMEDIATE success in the first place. Immediate success generates excitement, enthusiasm, and interest. More interest inspires more practice. More practice builds CONFIDENCE. And confidence perpetuates the student's desire to learn more and more. I call this the "self-sustaining learning cycle."
We have seen in all the previous lessons that drawing is absolutely a trainable skill. Plus, drawing skills can dramatically increase your communication skills, which in turn can have an enormous impact on your life.
7. Draw a horizon line above the house and position the light source. Clean up your drawing by erasing the guide lines.

8. Using the lines already drawn in the NW direction as a reference, easily apply the framework for the shingles. Draw a guide line SW on the ground to add a drop shadow. Apply shadows along the base of the roof. The closer to the roof, the darker draw a line along it, pushing it deeper into the picture.

9. Complete a simple house with roof tiles, make the nearest tiles larger and smaller as you move away. Draw a window, keeping the lines parallel to the edges of the paper. It's the same with the door. Draw vertical lines for the door, corresponding to the vertical lines for the center and right side of the house. You can paint on additional details, for example, in the form of bushes.

10. Add slopes to the window and door. Finish the drawing with hatching. Great job! You drew a cute little house in the steppe.
LESSON 12: PRACTICE EXERCISE
Understanding how basic shapes, such as a cube or a sphere, can become objects of the real world is the main goal of this book. Take a look at the picture of the mailbox. Try drawing this box yourself. Start by turning the cube into a letterbox. Next, shape the front of the box on the right and left. Again, notice that the near edge of the box is longer. This is another example of how dimension creates depth. Draw the post and details of the box. See how the dark shadow pushes the post under the box. Complete your mailbox by adding other details. These small details - the postal flag, the pen, the address, and especially the texture of the wood - complete this drawing perfectly. The texture adds a visual sensation to the surface of objects: fur on a cat, cobble on the street, scales on a fish. Texture is a delicious "flavor" that adds flavor to your drawing.

Don't forget to show off your work in