We grow crystals at home. Making a crystal from salt at home without special reagents
Crystals can be grown from almost any substance. Crystals are obtained from proteins, iodine, and various metals. Not many people know that crystals can be obtained even from air by cooling it to a certain temperature. However, in an ordinary environment, crystals are most easily grown from inorganic salts. In this article, we will consider a method for growing crystals from copper sulfate, which is easy to find and purchase.
First of all, we suggest that you familiarize yourself with the experience process in the video.
What do we need:
- copper sulfate;
- Cup;
- hot water;
- plate;
- cardboard;
- colorless nail polish

The very first thing to do before starting to grow a crystal is to make a seed, that is, a crystal, which is then dipped into the solution. This crystal will grow in the future. The seed should be about the size of a pea.
First, take a glass and add about half or a third of the salt to it.

Then we pour hot water into our glass, and mix everything thoroughly.

It is quite easy to check if enough salt has been poured. To do this, you need to continue to pour salt until it stops dissolving.
After the salt has ceased to dissolve, and the solution has become as saturated as possible, it must be filtered, since usually the salts contain impurities of various insoluble substances.

After the solution is filtered, you need to throw it to the bottom a small amount of small crystals and leave this glass for a day so that large crystals form at the bottom.

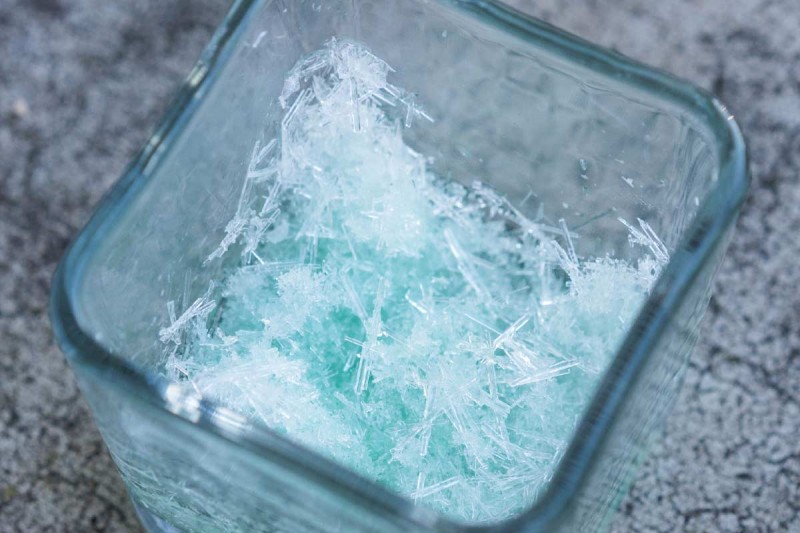
After 24 hours, large crystals are formed at the bottom of the glass, the size of which is quite suitable for seeding.

We pour the solution into another glass, since we need to pick out the resulting mass of crystals. To do this, take a knife and pick out the accreted mass of crystals at the bottom of the glass.

Pour the crystals into a plate and choose the smoothest and largest crystal.


After we have chosen the largest and most "successful" crystal, it must be tied with a thread.

You also need to take a piece of cardboard and make a simple system, as shown in the picture below.


We hang the crystal in a glass with a solution. The system of a piece of cardboard that the author uses and that we offer, allows you to provide the most efficient environment for growing crystals. Thanks to this system, dust does not enter the glass.


Crystal growth takes a lot of time and patience.
Crystals surround us everywhere. We eat them, walk on them, use them to make various tools and devices. You can do an interesting experiment and grow them at home. Consider photos of homemade crystals, you can get large and small, transparent and colored copies. It all depends on your desire and patience.
Salt crystals
TO simple experiment you can attract children. It only needs salt and water. There is no need to use additional reagents, so this is a safe process. This is an exciting activity, every day you can observe how the crystal gradually increases in size.


Preparing for the experiment
Before starting work, decide on the place where the container with the crystal will be located. During growth, do not move or tilt the dishes. It is better to take sea salt, as it does not contain foreign impurities.

Take distilled water or boil and filter it. You can also use regular table salt for the experiment.

Do not pour the solution into a metal dish. Novice researchers are interested in what crystals can be made on their own.

The size of the crystal depends on the duration of the experiment and the volume of the container. As a basis, choose a thread, wire, twigs or a piece of salt.

Growing
Take half a glass of water, pour into a saucepan. Then the dishes are put on fire and brought to a boil. Let's consider what crystals can be grown from at home.

For the formation of crafts from table salt it will take a few days. Sea salt forms a crystal in 2 days. If you choose iodized salt, you will have to wait a long time for the result.

It is necessary to prepare a saturated solution. Salt is added to warm water until it stops dissolving. Prepare the thread for the base, attach a small crystal of salt to it.

The rope must not touch the bottom or sides of the cookware. The other end of the thread is tied to a pencil, which is placed on top of the container. Now you need to watch the growth.

Sugar crystals
Sweet and colorful products will delight children. To get them, just follow the instructions for growing crystals at home. For the experiment, you need 2 glasses of water, 5 glasses of sugar, wooden skewers, a saucepan, transparent containers, paper.

First of all, prepare the sugar syrup. It will need a quarter glass of water and two tablespoons of sugar. Put this mixture in a saucepan on fire.

After that, dip the skewers in the syrup one by one, and then sprinkle with sugar. The workpieces must be dried well, it is better to leave them until morning.

Growing process
Pour 2 cups of water into a saucepan and gradually add 5 cups of sugar. Stir the solution constantly. If the sugar is completely dissolved, remove the syrup from the heat. We leave it for 15 minutes to cool down. Cut out paper mugs. They must be larger than the diameter of the containers.

To figure out how to properly grow crystals with your own hands, you need to carefully study the sequence of actions. This will help you get the desired result.


Pour the cooled syrup into glass containers, you can add food colors to them. Then blanks with paper circles on them are lowered into the glasses. The skewers should not touch the bottom and sides. It will take a week to grow sweet crystals.

Note! 
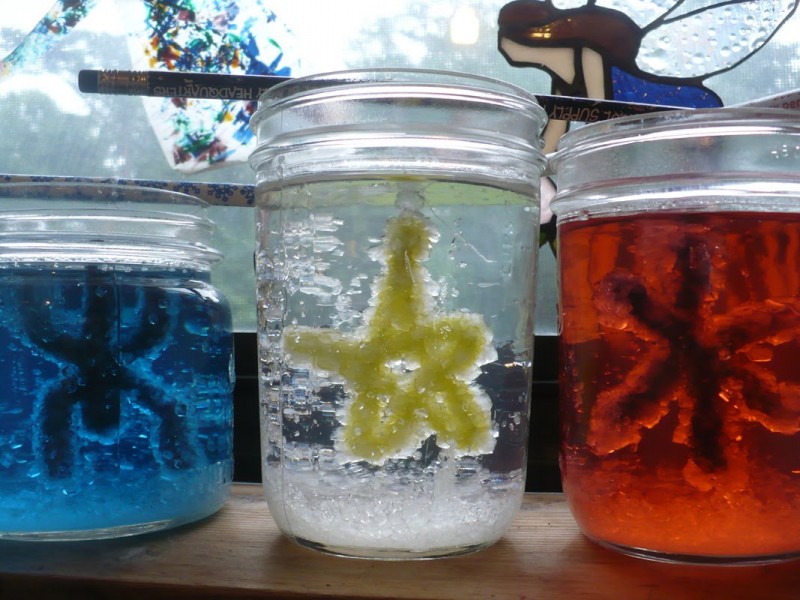
Copper sulfate crystal
This experiment requires strict adherence to safety precautions. We need water, a glass container, and copper sulfate. You need to buy a homogeneous powder of bright blue color in the store. Pour 100 g into a jar and pour hot water, stirring constantly. We get a saturated solution, filter it and put it in the refrigerator.

The next day, we choose the largest crystal, fix it on a thread and place it in a jar with a filtered solution.

The container must be covered with paper so that dust does not get there. The growth process takes several weeks. Then we take out the crystal and cover it with colorless nail polish.

Conclusion
Growing crystals is a fun process. To obtain an excellent result, it is important to adhere to the technology. To practice, you can buy a special kit for growing crystals at home. Sweet products can be tasted at home tea.


At a certain point, the crystals stop growing. At this, you can end the experiment, or prepare a saturated solution again and lower the crystal there. He will grow even more. Growing crystals is an interesting and educational process.

Photo of crystals at home

Note! 


Note! 


Our little new acquaintance Genie promised to show and teach how to grow crystals at home. Young archaeologists share with us their impressions and experiences.
What are crystals?
Crystals are solids, having a natural external form of regular symmetric polyhedra, based on their internal structure. The first studies of crystals are related to early XVII century.
They grow and “multiply” on their own, which is why they can rightfully be called “alive”. Most crystals require water as their main ingredient to "nourish" them.
How to grow a fluffy crystal
Fluffy crystal - amazing and very fragile. Modern "chemically grown trees" are based on it. We ! And today we have completely grown such a tree ourselves.
To grow a fluffy crystal, we needed:
- Polyvinyl alcohol
- Hot water
- Urea
- Dye
- Liquid soap
- Filter paper
- Petri dish, or saucer
- Measuring spoon
- Glass vessel
- Beaker
As with creating fun, you first need to dissolve 5 g of polyvinyl alcohol in 100 ml of hot water in a glass jar on a water bath.
Now for the creative process: create a “tree” from filter paper. To do this, cut out a rectangle from the circle and make a cylinder out of it, fastening it with a stapler. After that we cut one edge into "petals" and bend them slightly to the side.
The progress of the experiment on growing a fluffy crystal
Let's prepare a saturated solution of urea. To do this, pour 15 g of urea and a few grains of dye into a glass.

After stirring, add 15 ml of hot water.
After thoroughly mixing the solution again, add 2 ml of the prepared solution of polyvinyl alcohol to the glass. For more intense crystal growth, it is recommended to add a couple of drops of liquid soap.

Now we pour the solution into a Petri dish, in the center of which we place the prepared base for crystals - "wood". And ... watching and wondering!

The first crystals appeared in 20 minutes:

Here they were in an hour:

In a day:

Crystals grow intensively and quickly, but at the same time they are very fragile. But to be honest, this property is very fascinating for children. Because when I allowed them to do whatever they wanted with the trees, at the end of the experiment, they with great pleasure and for quite a long time “broke” the fluffy crystals, examined them, carefully studied them, touched them ...
How to grow a polycrystal
Polycrystal Is a crystal consisting of many differently oriented small single crystals. Due to their irregular shape, they are often called crystallites.
To grow a polycrystal at home, you need to acquire the following:
- Dye
- Ammonium monophosphate
- Hot water
- Wand
- Thread
- Measuring spoon
- Beaker
Carrying out an experiment on growing polycrystals at home
Prepare a saturated solution of ammonium monophosphate. To do this, pour the substance into a measuring glass up to the 100 ml mark, add the dye and pour 150 ml of hot water. Stir the solution thoroughly for a couple of minutes.

Now we tie a thread to the stick and for 2-3 minutes we lower its end into the resulting solution to a depth of about 5 cm. After that we take out the thread and leave it to dry for 10-15 minutes. This triggers the formation of crystal growth centers on the thread.

We again lower the thread into the solution and observe. Intensive crystal growth begins within an hour:

The longer the crystal remains in solution, the larger it becomes.
We watched interesting picture... In addition to the thread, we left the stirring stick in the glass with the solution, and no less beautiful polycrystals grew on it, which very quickly turned into "ice cream on a stick" and carried our son away for a long time.

Polycrystals grow very beautiful. It's interesting to look at them in the light. The light refracts from the edges and gives out a little rainbow ...
How to grow a single crystal
Monocrystal- a separate homogeneous crystal with a continuous crystal lattice. Growing a single crystal at home requires much more time and these are the ingredients and materials:
- Potassium alum
- Hot water
- Dye if desired
- Measuring spoon
- Filter paper
- Beaker
- Stir stick
First you need to prepare the "seed". For her, we prepare a solution of 3 spoons of potassium alum and 50 ml of hot water.
Now we pass the solution through the filter, rolling it up in the form of a funnel. Filtration takes a long time. When my son wanted to speed it up, stirring with a stick, the paper broke and had to be done again. So it’s better not to rush.

The filtered solution, covered with paper, must be left for 10-15 hours. During this time, crystals of potassium alum form at the bottom of the glass, which will serve as a "seed".
Drain the saturated solution into an empty glass, select the largest crystal and tie it to the tip of the thread. Tie the other end of the thread to the stick.
Again we prepare a solution of potassium alum and hot water, using this time the ratio: 9 spoons of the substance and 150 ml of water. If desired, dye can be added to the still dry substance.
When the solution cools down, filter it and lower the thread with the "seed". Cover the glass with paper and be patient: the crystal grows for a long time - 3-4 weeks.

Unfortunately, we failed to grow a single crystal. Apparently we were in too much of a hurry and we got several pockets of growth. Thus, we have grown another polycrystal ...

To carry out all these exciting experiments on growing crystals at home, we used just one set of chemical experiments for children from "" - Secrets of Crystals .

Several days of experimentation flew by quickly and excitingly. Every morning, my son was in a hurry to watch how much his crystals had grown.
We also had experience in growing crystals from salt. It turned out to be a beautiful polycrystal white... Did you grow crystals at home? Share your experience and impressions!
PS: You can buy these and other sets of the SuperProfessor series here.
I wish you a fun summer!
With warmth,
Alexey, Arseny and Lyudmila Potsepun.
If you like experiments or want to spend time with your child in an interesting and useful way, we suggest interesting idea, for growing crystals at home. For an organic entry into the world of entertaining science, we have chosen a very interesting and safe topic. In our article you will find step by step instructions how to grow a crystal from salt, with step by step photos and video.
Necessary materials:

Note: young and aged experimenters should not try to grow "colored salt crystals" using food and decoration paints such as gouache or watercolors. The crystal growing solution should be as pure as possible. That is why distilled water is considered the optimal liquid for such an experiment, since it is free of various salts and impurities.
How to grow a crystal at home - step by step instructions

Important: when storing the crystals obtained, it should be borne in mind that moisture evaporates in the air and the crystals are destroyed. To fix the results, the surfaces must be varnished. According to the results of observations, the next day, the changes in two vessels are striking. In the working vessel with the filtered solution, the seed crystal did not change in size. In the control vessel, salt flakes precipitated and the salt precipitate crystallized.
Our salt crystal is ready!


Please note: in order to speed up the process, the working solution must be changed periodically. That is, again prepare a saturated saline solution and place the growing crystals there.
When working with crystals for a long time, it may become necessary to grow certain forms. There are also special techniques and rules for this. You can correct growth by removing ugly growths with a knife, scraping off excess. Faceting can be prevented by treating the crystal planes with petroleum jelly. If further growth is necessary, remove the petroleum jelly with acetone.
Diamond, amethyst, emerald, topaz, sapphire - all these precious stones fascinate with their multifaceted beauty. They belong to the group of crystals and are most often made in natural or laboratory conditions. If you like experimenting, then the information on how to grow a crystal from salt is just for you.
Note to the amateur experimenter
Some people are skeptical about such processes and believe that it is almost impossible to grow a crystal at home. We hasten to dissuade you and tell you how to make a crystal out of salt. Of course, you will not succeed in a gem, but it is quite possible to create a polyhedron with an original texture, which will dazzle with its beauty and enchant with its extraordinary geometric shape.
Before we learn detailed instructions how to grow a crystal at home from salt, let's clarify some points of this difficult process. To be successful and craft your own salt crystal, consider the following:
- Suitable for growing a crystal different kinds salt, in particular, sodium chloride, sea salt, copper sulfate and even potassium permanganate.
- We choose a container of a suitable size according to this principle: more is better and more beautiful.
- It is not recommended to shake or move the container during crystal formation, otherwise you may destroy its already fragile texture.
- For such an experiment, you can buy a ready-made set necessary materials or use the means at hand.
- The duration of crystal growth depends on the desired result.
- It is not recommended to unnecessarily remove the crystal from the container in which it grows without special need.
- There is no need to add food coloring to the solution.
- As the solution evaporates, the container should be refilled.
- Distilled water is best suited for preparing the solution.
- The container with the crystal must be placed in a place where there is no tangible and sharp drop in temperature marks.
- The grown crystal must be protected from dust.
- Do not paint the grown salt crystal with watercolor or gouache paint.
Few people know how to grow a crystal from table salt. This is not surprising, because we do not come across such activities every day. But for the sake of experiment, you can refresh your memory of the course of school knowledge in chemistry. To grow a salt crystal at home, it is not necessary to know the whole mechanism of formation. geometric shape from solid particles, but it is enough just to properly prepare the solution.
- we use filtered or ordinary tap water;
- the amount of table salt added to the solution, individually;
- a sufficient amount of salt will be indicated by the difficulty of stirring it in water;
- the solution must initially be heated in a water bath to 50-60 °;
- only in a cooled solution do we put a small crystal;
- the prepared mixture must be filtered through a gauze cut.
Home experiment: grow a personalized crystal
If you are delighted to watch various experiments, and the beauty of precious stones fascinates and delights you, then the information on how to grow a crystal from salt on a string is just for you.
You don't need to spend a lot of money on purchasing the necessary materials. You already have everything you need to conduct such an experiment. Please note that individual crystals may not remain after preparation of the solution. In this case, they can be replaced with a small plastic object, which we pre-soak in saline solution and dry thoroughly.

Necessary materials:
- table salt;
- filtered water;
- crossbar (simple pencil, pen, plastic stick, etc.);
- capacity;
- gauze cut;
- a thread;
- paper.

Bright Geometry Edges
It is not difficult to grow a crystal from salt at home. You just need to be patient. As already mentioned, it is not recommended to add any dyes to the solution. This can inhibit the growth of the salt crystal and disrupt its solid texture. You can add a natural colorant to the solution - copper sulfate. Potassium permanganate is also quite suitable, then the crystal you have grown will sparkle with red edges.

Necessary materials:
- copper sulfate;
- filtered water;
- capacity;
- a thread;
- crossbar;
- paper.
Crystal growing process:

If you add potassium permanganate, the crystal will take on a rich raspberry or red hue. Do not use gouache or watercolors as they will not adhere to the crystal surface.